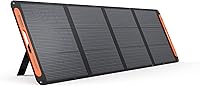
How to Install Renogy Solar Panels
To install Renogy solar panels, secure the panel in a sunny spot, connect the battery to the charge controller first, then connect the panel. Follow the manual for your exact panel and controller, and verify polarity before making each connection.
On this page (7 sections)
- What should you check before installing Renogy solar panels?
- Where should you place and mount the panel?
- How do you connect the charge controller and battery?
- How do you route and connect the solar cables?
- What should you check before charging?
- How do you choose between a fixed and portable installation?
- What is the safe installation sequence?
To install Renogy solar panels, mount the panel securely in a sunny location, connect the battery to a compatible charge controller, then connect the panel. Use the manual for your exact model, keep wiring dry, and check positive and negative polarity before connecting.
Start by confirming the panel, controller, battery, and cable are compatible. A portable solar panel buying guide can help you understand the basic parts and decide whether a fixed or portable setup suits your needs.
What should you check before installing Renogy solar panels?
Before installing Renogy solar panels, check the manual, component limits, mounting surface, and cable route. The panel and controller must suit the battery and any power station input limits.
Find the panel model and the controller model, then use their manuals to confirm voltage, current, terminal labels, grounding, and permitted wiring. Don't guess from a connector shape or a panel's wattage alone.
Choose the installation location before laying out the cable. For a portable setup, a stand with wheels for portable solar panels can make repositioning easier, while a roof installation needs a mount designed for that surface and travel conditions.
Gather the tools and fasteners specified in the Renogy instructions. Keep the panel disconnected or covered during wiring, and don't work on a wet surface or with damaged cable.
Where should you place and mount the panel?
Place the panel where it receives clear sunlight for the hours you need power, then secure it using the method specified for that model. Shade from trees, roof fixtures, or nearby objects can reduce solar output.
For portable panels, set the legs or stand on stable ground and angle the panel according to the instructions. Our guide on which way to face solar panels explains how direction and angle affect sun exposure.
For a roof or permanent mount, check the surface, brackets, fastener locations, and cable entry before drilling. Avoid blocking vents, interfering with moving parts, or leaving a route where the cable can rub against sharp edges.
A tracker may help keep a portable panel aimed toward the sun, but it adds moving parts and setup needs. Read whether a portable solar panel tracker is useful before choosing one.
How can you keep the panel secure?
Secure the panel against movement, wind, and accidental contact using its approved mounting points. Check the attachment before each use, especially after moving a portable panel or driving an RV.
Don't rely on a loose panel resting on a roof or stand. Our guide to keeping portable solar panels secure covers practical ways to reduce movement and theft risk.
How do you connect the charge controller and battery?
Connect the battery to the controller first, with the panel disconnected or covered, unless the controller manual specifies another sequence. This gives the controller a chance to recognize the battery before solar input begins.
- Switch off the controller if it has a switch, and cover or disconnect the panel.
- Confirm the battery type and controller settings in their manuals.
- Connect the battery leads to the controller's battery terminals, matching positive to positive and negative to negative.
- Check that the connections are secure and the controller indicates the expected battery state.
- Connect the panel leads to the controller's solar terminals, again matching polarity.
Some controllers use a different connection process or require specific settings. Follow the Renogy manual for your exact model, and stop if terminal labels, wire colors, or connector types don't match your equipment.
Keep exposed conductors from touching each other or metal surfaces. Don't connect or disconnect wiring under load unless the equipment instructions say that is safe.
What if the panel has a separate controller?
A separate controller sits between the panel and battery, so connect it in the order its manual requires. For example, a foldable kit may include a controller and its own cable, which can make the panel easier to position while keeping electronics shaded.
The DOKIO 100W kit includes a standalone PWM controller for 12V battery charging, with a 9.84 ft cable. Check the controller's limits and connectors against your system before using it.
Don't assume a Renogy panel will work with another brand's controller just because the plugs fit. Confirm the electrical limits and battery compatibility in both manuals.
How do you route and connect the solar cables?
Route cable so it stays protected from water, heat, sharp edges, pinching, and foot traffic. Leave enough slack for movement without letting loops hang where they can snag.
Use only cable and connectors rated for your system. If you need more reach, confirm the wire gauge, connector type, current, and voltage are suitable before adding an extension.
The BougeRV cable set includes 20 ft of 10AWG extension cable, with connectors on one end and bare wire on the other for a controller connection. Its connector has a built-in lock, and the cable is described as UV resistant.
The bare-wire end must be terminated correctly for your controller, with polarity checked before connection. Use the cable instructions and appropriate connection method, and don't leave bare conductors exposed.
What should you check before charging?
Before relying on the system, check polarity, secure connections, controller indicators, and cable condition. Confirm the controller recognizes the battery and solar input as described in its manual.
Keep the panel in sunlight and the controller dry with room for airflow. If the controller reports a fault, disconnect or cover the panel using the manual's procedure, then inspect the wiring and settings.
Power stations can limit how much solar input they accept, even when a panel could produce more. The DOKIO 200W kit includes a standalone PWM controller for 12V battery charging, and its guidance notes that some power stations cap input.
Check your power station's input limits before connecting a panel or controller. Never exceed the voltage or current limits stated for any part of the system.
How do you choose between a fixed and portable installation?
Choose a fixed installation when the panel can stay mounted in a location with dependable sun and a protected cable route. Choose a portable setup when you need to move the panel to avoid shade or store it between uses.
For a portable kit, compare the controller arrangement, cable reach, connectors, and storage needs. A Renogy 100 watt solar panel guide can help you compare a specific panel option, while a guide to the best portable solar panel with charge controller focuses on kits that include that component.
A suitcase kit can be useful when portability and quick setup matter. See the best suitcase solar panel kits for options and setup considerations.
What is the safe installation sequence?
For most controller-based setups, the practical sequence is mount and inspect, connect the battery to the controller, then connect the panel. The equipment manuals take priority if they specify a different order.
Before use, confirm the panel is secure, cables are protected, connectors are fully seated, and polarity is correct. If you can't identify a terminal or verify compatibility, pause and ask a qualified installer or the equipment maker for guidance.
Choose a fixed mount for a lasting installation with a suitable surface, or a portable setup when you need to move the panel with the sun. In either case, follow the model-specific instructions and recheck the connections after setup.
Frequently asked questions
Do you connect the solar panel or battery to the controller first?
Connect the battery to the charge controller first, then connect the solar panel, unless the controller manual gives a different sequence. Keep the panel covered or disconnected while wiring, match positive and negative terminals, and follow the Renogy manual for the exact components in your system.
Can you connect a Renogy solar panel directly to a battery?
A panel should not be connected directly to a battery unless the system instructions specifically allow it. A compatible charge controller regulates charging and helps protect the battery; confirm the panel voltage, controller limits, battery type, and wiring requirements before connecting anything.
How do you mount a Renogy panel on an RV?
Use a mounting method approved for your Renogy panel and RV, and secure it to a suitable surface without blocking vents or creating a leak path. Check the panel manual for bracket spacing and fasteners, route and protect the cable, and inspect the mount before travel.
Can a portable solar panel stay in direct sun while its controller is shaded?
Yes, when the cable length and system instructions allow it, place the panel in direct sun and keep the controller shaded, dry, and ventilated. Avoid stretching or pinching the cable, and confirm any extension cable is compatible with the panel and controller.